Sunday, March 10, 2013

We're Starting a Garden!

Several years ago I tried container gardening with a couple tomato and pepper plants. It didn't turn out well. My yard was too shady and I always forgot to water it.  I don't recall if we even got it to bear fruit, but I did leave the pot outside in the winter and it cracked.

This year I am really motivated to give it a try again! We are in a different house and I've really been watching the yard for where the best sunlight is. I've also decided to try starting from seed.

Instead of buying the seed starting trays, I am using halved toilet paper tubes in pans. Possibly a recipe for disaster, but if it doesn't work I guess I'll just go buy plants at the local nursery!
So far I have planted cucumbers, mini- bell peppers, a variety of hot peppers, and a tray of mixed lettuce. I have them setup in the basement. It's probably not warm enough down there, but it does get a good bit of sunlight through the windows.


I have seeds for beans, purple carrots, and spinach also, but I ran out of starting containers. I think I'll also buy some small tomato plants when it is time to move everything outside... I hope it warms up soon!


Thursday, February 14, 2013

Love Rocks!

Happy Valentine's Day!  I made these little rocks for the girls at work.  Pretty simple, but fun- paper hearts Modge Podged on to smooth rocks I bought at the dollar store.

Wednesday, February 6, 2013

Plastic Grocery Bag Crocheted Tote

This project took what felt like eternity and a million plastic bags! About 1/2 way through I said I would never, ever make one of these again, but now that it is finished I might do more, just not nearly as large.

I cut up plastic grocery bags into rings and looped them together to make plastic yarn, or "plarn" as the tutorial I was inspired by referred to it. I have no clue how many plastic bags this actually took. My best guess is at least 100?

The only other good use for the plastic grocery bags is as small trash bags since they don't recycle them around here, so I guess I make more? I think next time I might make a lunch bag sized one. I might also branch out to using a wider variety of colored bags or make a more complex patten than just the one stripe.

Sunday, January 20, 2013

Etched Glass Mugs


A girlfriend needed a gift for the seniors on her son's bowling team but was on a budget.  Trying to think of something that works for both boys and girls and something that they might actually keep and use, we came up with etched, glass mugs!  This is a super easy process that has a great outcome.  I use a Cricut to make my stencil, but you can use an exacto knife to cut out your design and it works just as well- just takes a bit more time.

As luck would have it, the Dollar Tree had just gotten in these glass mugs.  I cut the stencils out of vinyl, put on the etching cream, and voila!  A functional keepsake that looks pretty cool.  She is going to fill them with candy and wrap them up in school colored cellophane. 


Sunday, December 30, 2012

Now I Crochet?!

I guess I need another craft to get involved with?!  A gal from work peaked my interest to try crocheting again when she brought in some cute hats she had made her grandkids.  I had done a little bit as a camp counselor about 15 years ago.  Since then, the hooks and 1/2 finished projects have been traveling around in my craft supplies. 

I started with a basic scarf and it turned out "ok" but it is a cheap gray yarn that I would never expect anyone to wear.  I branched out yesterday and bought pink camo yarn.  Searching for a manageable project, I thought my tea mug needed a sweater.  It turned out better than I thought on a first try without a pattern, although it really isn't a complicated project.  

Now I am looking for more things to crochet for practice.  So if you need something small and basic, let me know.... Who else wants a MUG SWEATER?

Lucy's Polka Dot Room


We have been hemming and hawing about what room to put Henry in before he was even born, which means he has been living in our room for over 8 months- much longer than ever intended.  This week we finally bit the bullet and made the decision.  We have moved Lucy to the spare room and Henry will get Lucy's old room.  It has the perfect set-up with a built in changing table and the spare room has a larger closet and we all know girls somehow accumulate more clothes than boys.

The spare room lacked any sort of decoration.  Just boring beige walls.  We are limited on what we can do to the walls because we rent, but I knew we needed to add some color.  After weighing several options, I elected for using adhesive vinyl.

I used my Cricut and cut 3" circles out of four different colors (Navy,Pink, Lilac, and Green), in addition to her name in Lilac.  Once all my stickers were cut, I went to laying it out.  It was really a very quick process and in total, I probably only invested about 3 hours between cutting an applying.


I also bought window sheers to coordinate.  In total, the room make-over only cost about $25 because everything used just happened to be on sale and I already had the cartridge to cut the circles.  And it was money well spent.  Lucy LOVES it!  She especially loves the green sheer.  Every time she goes into the room she points and lights up!  It certainly made transitioning to a new room a little bit easier.

And for our friends and family that frequently use the spare room in our house, don't worry.  The wonderful air mattress still fits in the room great and we will figure out somewhere to put her when you visit!


Up-cycled Dress-up Wardrobe

It must have been about a year ago that I reached a breaking point of dealing with Lucy's 1/2 broken dresser.  The bottoms of the drawers always seemed to know the absolute worst time to crash through.  I had seen so many up-cycled kids furniture projects on Pinterest and showed this one to Rudy.  He embraced the idea and did this project 100% by himself! 

He haggled for the pink drawer knobs a few months earlier at a flea market, bought butterfly fabric for the inside, found butterfly stickers and mirrors for the outside, painted it obnoxious pink, reenforced the "floor" of the closet, fixed the bottom drawer, and added the clothes rod. 

We filled it with dress-up clothes and gave it to Lucy for Christmas.  I'm not sure that as a 2 year old, she can fully appreciate it, but she certainly is enjoying all the dress-up things and I appreciate that it contains them all and that it is so freakin' cute!

Thursday, November 15, 2012

Advent Books

I feel like it is still way too early to start thinking about Christmas, but it seems like everywhere I turn, decorations are going up.  So let the preparations begin... 

My parents always got me an Advent calendar each year to count down to Christmas.  Sometimes it had chocolate, sometimes toys, and one time, my favorite- little wooden ornaments.  I knew this was something I wanted to do with my kids but was trying to think of a fun, unique variation.   I realize this year Lucy probably won't grasp the concept of counting down to Christmas and Henry is still way too little, but I thought it would be a fun regardless.


 Well, Lucy LOVES books! This summer I started collecting Christmas books at yard sales, library sales, and thrift stores.  With the help of some friends, I finally found the last few I needed to hit 24. I wrapped each one and labeled it with a number so we open one each day.  Now I just need a basket for them!

On December 1, I will pull them out and let Lucy open the first one.  I don't know what order they are in, so I'll be surprised by each one also!  I hope she has fun with it and I know I'm in store for a lot of bedtime book reading now...

Sunday, July 8, 2012

The Queen's Dress

We went to the Long Grove, IL Annual Strawberry Festival a couple weeks ago and on somewhat of a whim, we entered Lucy in the festival's pageant.  Before I get all the side eyes, this was a completely natural pageant with the girls wearing strawberry themed attire.  No "Toddlers and Tiaras" sort of stuff, no flippers, fake hair, tanned infants, $1000 dresses, etc... although we did see some questionable parent behavior, kids downing pixie stix, and other very, very interesting things that kept us entertained during all the waiting, but I digress.  We were heading to see friends and family for the weekend and decided if we had time that we would stop on the way back home to enjoy the festival and enter Lucy in the pageant, but again, only if we had time.  Seeing as we would probably make time, Lucy needed strawberry themed attire.

I had bought a fitted crib sheet with a strawberry print a couple months ago at Goodwill.  Crib sheets are unreasonable expensive and I thought this one was cute and in really good shape.  Well, once we decided we were entering Lucy into the strawberry pageant, it didn't stay a crib sheet for long.  At about 11:30pm night before we left, the sheet to transform into a dress.  I used one of my favorite little dress of Lucy's as a rough guide and cut the crib sheet into two pieces- a back and a front.  Since Lucy was fast asleep when I was doing this and we had no time to spare since we were leaving the next day immediately after work, I decided it needed elastic in the back just in case it didn't fit quite right.  I used the elastic corner of the sheet for the back piece.  After I sewed the two pieces together, I use some red ribbon left over from another project to trim the edges and make the halter top straps.  Luckily, Lucy had a pair of bloomers that would coordinate in color with the dress so I didn't have to make anything special for underneath and we already had cute shoes and a hair bow that would work.

The pageant was a hot mess.  Literally.  The day of the pageant was incredibly hot.  Probably about 90 outside and it had to be nearing 100 degrees in the gym where it was taking place and the stage was even hotter.  So I was very glad that the dress was so light weight to keep Lucy relatively cool.  This was certainly a pageant for girls from all walks of life and experiences.  Most of the kids were crying and running all over the place while others stood perfect.  We were last in line on the stage and with a huge box goodies bags next to us- the ideal distraction for a 19 month old!  She looked everywhere except at the judges during the age division line up.  Between the lineup and Lucy's individual stage time, we realized that Lucy had quite the smelly diaper, but with no time to change her, she was a champ and we went back up for our quick appearance.  

We did the pageant just to see what it was like.  We weren't looking for her to win or anything- just something to try.  We stuck around for the crowning for the same reason- just to see what would happen.  They called the girls off stage one by one- giving them each their "princess" participation  crown.  Lucy was the last number in her age division so assuming that they go in order, I thought nothing about her not being called as others exited the stage, until I looked over and realized there was only one other girl left ... drum roll please... 

Lucy is the 2012 Toddler Miss Strawberry Queen!   


She also tied for Most Beautiful in her age division(18-24 months) and won Best Eyes in the 0-4yr pageant! 

I don't know if we will put Lucy in more pageants.  I suspect we might, but time will tell.  All I know is that you can whip up a dress out of a bed sheet, throw it on a sweaty kid, and win a pageant- no super expensive dresses, hair styles, or drama needed!

Saturday, May 19, 2012

Felt Play Food


About a month ago some girls on a discussion forum I participate on started talking about felt food.  They were doing a "Felt Food Exchange".  I didn't join in.  I couldn't figure out what the craze was all about, but after 3 weeks of being on maternity leave, I had to see what it was all about.  Of course, Pinterest was a great resource to investigate this.  Then, a friend gave little Lucy a hand-me-down play kitchen last weekbut we had no play food to stock it with.  I figured I would give felt food production a shot.  After $6 worth of felt, some batting I already had, and one afternoon of sewing, I ended up with the above stock of felt food items and quite a bit of left over felt.  I made two main dishes- breakfast and a sandwich.  Not everything turned out how I expected, which is why there are no bread slices and the waffles aren't exactly how I wanted them to look.  I ran out of some colors so the next day I took a trip to the craft store for more felt.
 

I love how the sandwich turned out- specifically I love the lettuce and the bacon!  Since the original production, I have also created pizza slices, peas, red pepper slices, pickle slices,  a banana, and additional tortillas.  I still plan to make broccoli, bread slices, pancakes, butter, ice cream, chips, pasta, and anything else I can come up with!

If you have a kiddo that needs play food and you have a sewing machine, then felt food is a good time investment!  It is much less expensive than the plastic or wooden store bought stuff and you can make whatever you want!

Friday, May 18, 2012

Taco Chicken Casserole

This isn't the prettiest dish, but it sure was tasty!  I'm sure there is some official recipe out there for this dish, but I just threw together some stuff from the fridge and pantry that sounded good.  I layered in the order listed. 

2 breasts raw chicken- diced
1/2 jar of Salsa
1 can of corn
1 can of black beans
1 cup uncooked rice
1/2 tub of sour cream
1/2 packet of taco seasoning(mixed with sour cream)
1/2 package of shredded taco cheese

The only thing I would have done differently is either put the rice as the second layer after the chicken with a cup of water or precook the rice because some of it was still chewy even though it was bubbling in the oven.

Sunday, April 8, 2012

Oreo-Peanut Butter Brownies

I saw this recipe on Pinterest and was compelled to make it last night.  Oreos and peanut butter layered and baked into brownie muffins...

Ridiculous is all I can say.  Ridiculously good!  I don't know when I will ever need to make these again, but it was fun to make them once.  If I do ever make them again, I think I would get mini-oreos and make them in mini-muffin tins.  A whole one is just too intense.   Here is the link to the original poster of this recipe: http://www.foodsnots.com/2011/10/oreo-and-peanut-butter-brownie-cakes.html

Monday, January 2, 2012

Upcycled Wool Mittens

Some of you may be wondering why I had scraps of wool sweaters lying around to make Lucy's Christmas Stocking with . . .  I have been making WOOL MITTENS!  They are so much fun to make and I absolutely love the way they turn out!  I gave a few as Christmas presents this year and some I am still working on.  They are so easy to make and it has let me fulfill my desire to discount shop, as the best place to get a variety of fun colored wool sweaters is yard sales, Goodwill, etc. 


A co-worker was recently talking about how expensive handmade wool mittens were at a local shop and that it couldn't be too hard to make a pair.  So I found a pattern online and adjusted it a bit to what worked for me and voila!  After a couple test pairs of liners to get the sizing right, I started cranking out mittens!  They are wool sweater material on the outside (after it has been washed in hot water/ soap and dried on high heat to shrink up the wool)  and the inside is new polar fleece.  So far I have made solid colored mittens with the exception of this one pair with the grey palms.  Soon I might venture out into mixing and matching sweater colors to be a little more festive.
  
Bring it on, WINTER!

Friday, December 30, 2011

Wool Christmas Stocking

Lucy's stocking last year was a cute pink "Baby's 1st Christmas 2010" stocking given to her by her Grand-dad, but this year I wanted to make her a unique stocking that had more of a Christmas feel.  I have been making things with old wool sweaters this season and had quite a few scraps left, and thought that would make a cozy, festive wool stocking!  I traced a stocking shape from one of ours that I like the shape of.  Then I cut the paper stocking into shapes for a pattern and left about a 1/2 inch around all sides for a seam allowance.  The whole process of making the pattern and sewing it together took less than an hour and was very easy.   I love how it turned out and it looked even better full of presents!

Friday, December 23, 2011

30 Sucks.

I saw this project on Pinterest a while back and kept the idea in the back of my head, knowing that I would have to have a friend turning a milestone birthday sometime in the near future.  Well, I had a friend turn the 30 last week.   So about a month ago I set out to make the "30 Sucks" sucker bouquet.  I went a fairly easy route- Bought a block of florists foam and 2 bags of Blow Pops.  Then I used 2 colored paperbags I had on hand cover the foam block.  I think next time I would use wrapping paper, but I was impatient and excited to make it and I liked the bright pink.  I used my new Cricut machine to cut "30 SUCKS." out of scrapbook paper and to make a little Happy Birthday card.  Using an exacto knife, I cut 30 slits in the top of the bags/block and stuck in the suckers.  Around the suckers I stuffed crinkle cut paper shreds(the kind you use in gift bags)... and Voila!

I thought it turned out very cute and hopefully it brightened her day for the dreadful 30.

Sunday, December 4, 2011

DIY Christmas Wreaths

We offer a wreath making class at our greenhouse and I went Saturday to join in.  It was quite intimidating in the beginning.  Of course, I was late and the other ladies were deep into the process.  They were clipping greenery, bundling, wrapping with wire, using a variety of supplies and I was clueless!  But I collected all my materials, observed some of the others, and jumped right in.  It was actually a lot of fun and turned out much better than I expected!  There were some ladies in the class that have been coming to the class for years even though they are nearly wreath making experts, so that they have all the supplies provided in a festive location.  Their wreaths were incredible!


I have never bought a fresh wreath (I have a cheap fake one that I have used for years) but I don't think I ever will buy one-  I will just make it from now on!  I wish I would have taken some pictures during the process to share with everyone, but maybe it is good I didn't so that next year I can gather a group of friends to take the class with me!

Sunday, November 13, 2011

Monkey Birthday Party!

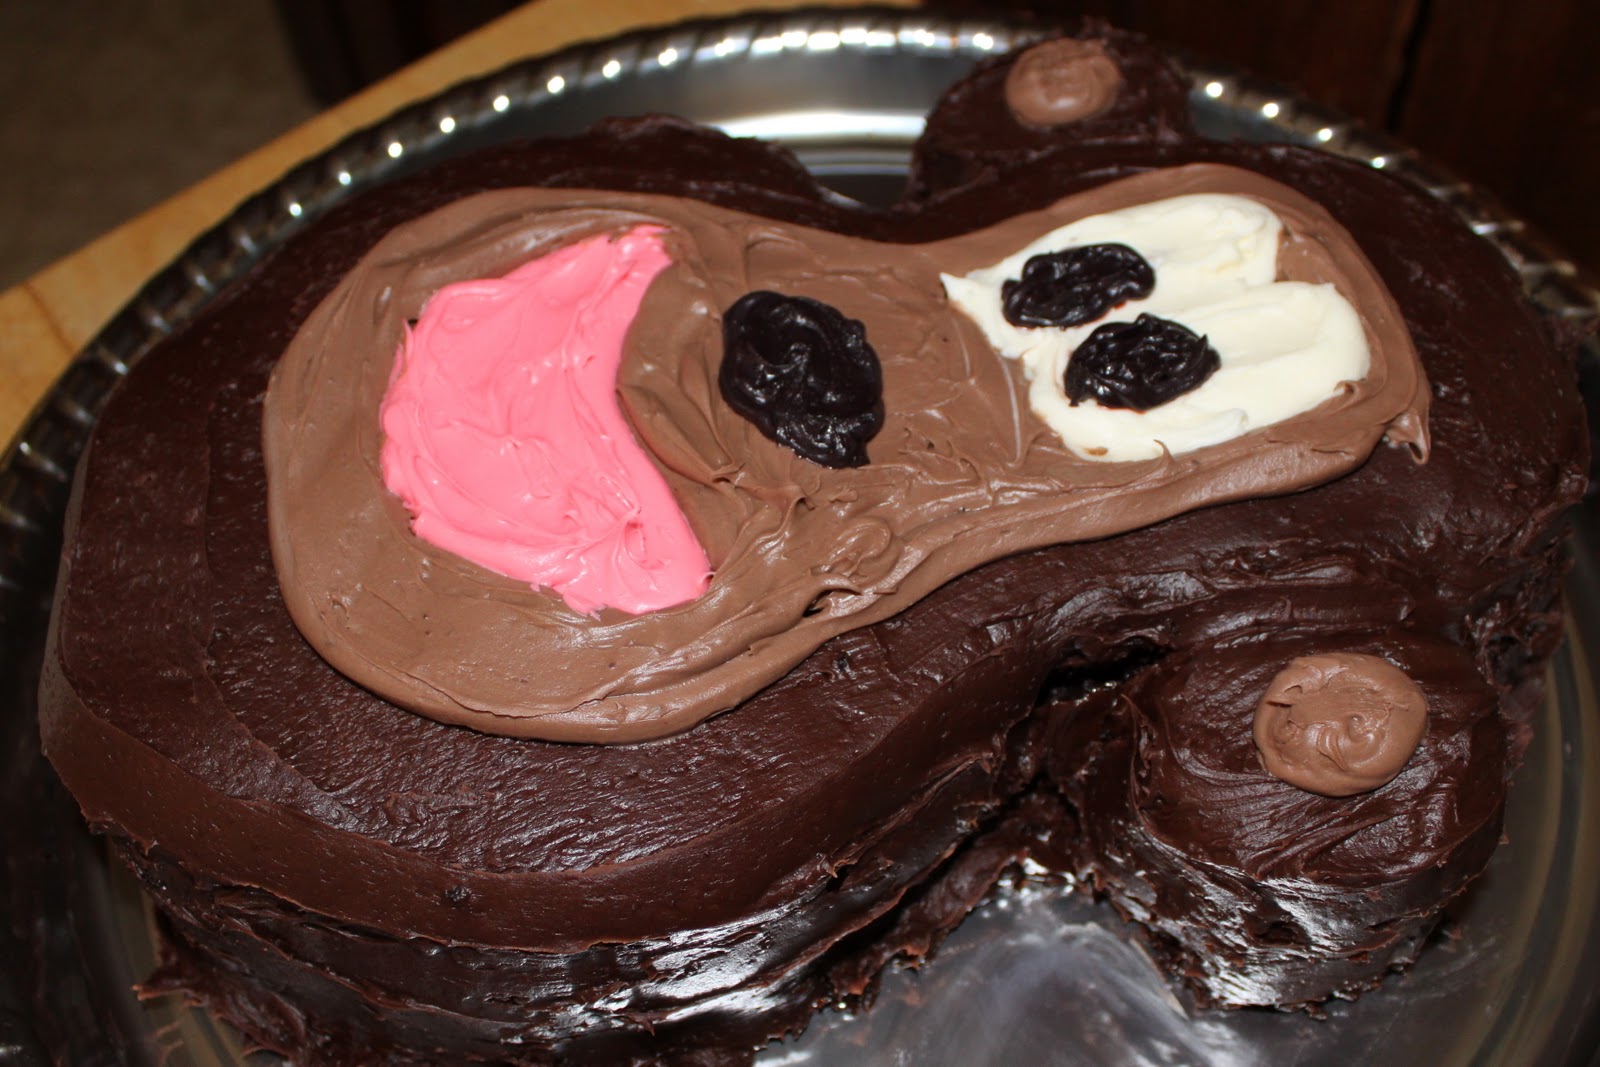
I just realized how long it has been since I posted last.  I guess it is evident that I have been chasing around my little crawler who has now turned 1!  I have also been working on a lot of things for her birthday party and didn't want to reveal them until party time.  So here we are!

Lucy's Monkey Cake... 

Cupcakes...

Lucy's "Smash" cake that didn't end up very smashed.  Turns out Lucy doesn't like to be very messy.  We will see how long that lasts!

 Lucy's 12-month photo banner and a "1" collage of her photos...

Lucy's Birthday Banner and Hand-cut monkeys!

Table decorations...


Lucy's "1" Onesie...

This posting is sponsored, in part, by friends and family that gave Lucy toys for her birthday that have allowed her to be occupied/distracted long enough for me to upload these photos!


Saturday, September 3, 2011

Yard Sales with a Purpose.

Rudy and I LOVE yard sales.  For years we would go with no plan in mind.  We would end up with all sorts of random crap that will end up in our own yard sale someday soon.  We moved this past spring and realized we have way too much random, underutilized crap. So we decided from now on we would yard sale with a distinct purpose and made a little list of items we would search for at yard sales.  If it isn't on the list, there has to be a very compelling reason to purchase it.  The things on our list aren't really need right away, just things we would like to have if they are the right price or that we will need within the next year.  It is kind of like a treasure hunt list.  Some of the things we have found this year so far was a Chicco hook-on travel highchair ($4), a microwave ($8), and today's find was a lot of 13 wooden embroidery hoops for $4!! I have a great craft in mind for the hoops, so as soon as I am able to I will share the finished product.

Thursday, August 11, 2011

Beer Bread


I made this recipe last night that I found in a HyVee circular.  It turned out much better than I ever expected!   I have tried making bread from scratch in the past and it always ended up too salty or too bland or didn't rise at all.  This might have had a little too much butter for my arteries, but I will certainly try it again.  I just used a Bud Light because that is what I had on hand, but I next time I might try a flavored craft beer.... Bent River Jalapeno Beer Bread anyone?


Monday, August 8, 2011

Freezer Paper Fabric Printing


This has to be one of the coolest crafts I have ever made.  Mainly because it is so easy and it has such a great outcome!  All you need is:
  • Freezer Paper (not wax or parchment, but paper with a plastic coating on one side)
  • Iron
  • Fabric Paint
  • Foam Paint Brush
  • Exact-o-knife
  • Pen or Pencil
  • Fabric item of your choice (I used one of Lucy's onesies)
I printed out an image I wanted to put on the onesie.  I selected a bowling ball with a pair of bowling pins, perfect for the start of bowling season!  Then I cut a piece of the freezer paper to just a bit larger than the image and traced the image onto the freezer paper with the plastic side down.  Using the exact-o-knife,  I cut along all the lines to make a stencil.  I didn't have to worry about the pieces all being connected since it gets ironed on to the fabric so the will stay put.

After it was ironed on, I used purple fabric paint in the fabric exposed areas.  The paint directions say to dry for 4 hours, but since it is spread out and I am impatient, I probably only left it for about 2-3 hrs.  Then I pulled all the paper off and viola!  I LOVE the outcome.  I ended up making two and will probably make a lot more once I get more colors.  I also plan to make some shirts and things for Rudy and myself.